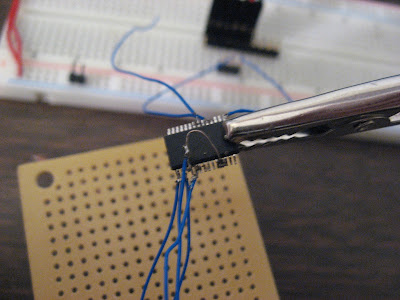
Over the past month of owning my Pi, one lacking feature bothered me. I had worked with a beaglebone for a few months beforehand and had gotten used to the easy, single cable development system on the beaglebone, so I decided to give my Pi a FTDI connection over the included micro USB port. The concept was simple and despite being a pain to solder, was pretty simple to implement.

For this hack, we only need a few of the pins on the FT232RL. We need TXD, RXD, AGND, GND, VCC, VCCIO, 3V3OUT, and TEST. You can start out by shorting the TEST and AGND pins, and the VCC and RESET# pins. After this, run a small piece of wire from 3V3OUT to VCCIO, and a small piece of wire from the GND next to VCC to AGND/TEST. The VCCIO pin takes in the voltage supply for the RXD and TXD pins, and since the Pi is 3v3, we need to tie it to the 3V3OUT pin voltage source. A problem that took some reading to figure out is that TEST needs to be pulled to ground in order for the device to enumerate correctly, or else the device will connect, but quickly disconnect with error messages about improper IDs.

After you have done all the bridging and shorting, the hardest part begins, attaching the ~30AWG wire to the FTDI chip. If your up to making a incredibly discreet breakout board and have it fit on the Pi, you'll likely save yourself some time, but due to time and money constraints, this works. You need to connect wires to TXD, RXD, GND/AGND/TEST jumper, VCC, USBDM, and USBDP (USB plus and minus). The latter two are what we will be connecting directly to the onboard usb header.
The next step is attaching everything to the Pi. Once you have finished soldering everything and are sure that you want to continue, you can superglue or epoxy your FTDI chip right onto the Raspberry Pi. For this step, solder the VCC wire to TP1 and the GND wire to TP2 for ease, as we do not want to crowd the usb header. After that, attach the RXD wire to the TX pin on the pin header, and vice versa for TXD and RX. After all those, it's time to attach the USB wires to the header.

As you can see in the photo and the schematic above, the second pin to the left is D-, so solder the USBDM wire, and to the center/third pin solder the USBDP pin. After all this you should now be able to attach your RasPi, type "screen /dev/ttyUSB0 115200" and see your boot commands. If you haven't set your Pi up to have a serial tty, it's time to set that up now.

In order to see boot messages over serial, your cmdline.txt should look similar to this:
And in your /etc/inittab file, change the line that should read similar to:
1:2345:respawn:/sbin/getty 38400 tty1
and change it to:
1:2345:respawn:/sbin/getty 115200 ttyAMA0
After that, you should be able to do single cable development on your Pi. Good Luck!
Links:
Raspberry Pi Schematics
FT232RL Datasheet

